This took me a while to work out, but finally I got it to work.
The Open Office XML documents utilised by Microsoft in Office 2007 are actually zip files that package a number of folders and documents. So to edit these files you need to be able access the contents.
Microsoft provides an SDK for this purpose there is a version 1 and a version 2 (in CTP, at the time of this article).
http://msdn.microsoft.com/en-us/library/bb448854.aspx – version 1
http://msdn.microsoft.com/en-us/library/bb448854(office.14).aspx – version 2
I downloaded version 2.
I built a simple website, added a reference the .net open xml sdk and created the following page and code behind.
aspx page
<%@ Page Language="VB" AutoEventWireup="false" CodeFile="createWordDocTest.aspx.vb" Inherits="createWordDocTest" %><!DOCTYPE html PUBLIC "-//W3C//DTD XHTML 1.0 Transitional//EN" "http://www.w3.org/TR/xhtml1/DTD/xhtml1-transitional.dtd"><html xmlns="http://www.w3.org/1999/xhtml"><head runat="server"><title></title></head><body><form id="form1" runat="server"><div><asp:Button ID="Button1" runat="server" onclick="Button1_Click" Text="Click to write to word" /></div></form></body></html>
code behind
Imports System.IOImports System.XmlImports DocumentFormat.OpenXmlImports DocumentFormat.OpenXml.PackagingImports DocumentFormat.OpenXml.WordprocessingPartial Class createWordDocTestInherits System.Web.UI.PageProtected Sub ReplaceCustomXML(ByVal fileName As String, ByVal customXML As String)Using wordDoc As WordprocessingDocument = WordprocessingDocument.Open(fileName, True)Dim mainPart As MainDocumentPart = wordDoc.MainDocumentPartmainPart.DeleteParts(Of CustomXmlPart)(mainPart.CustomXmlParts)'Add a new customXML part and then add contentDim customXmlPart As CustomXmlPart = mainPart.AddNewPart(Of CustomXmlPart)()'copy the XML into the new part...Using ts As New StreamWriter(customXmlPart.GetStream())ts.Write(customXML)End UsingEnd UsingEnd SubProtected Sub Button1_Click(ByVal sender As Object, ByVal e As EventArgs)Dim strPath As String = "c:\temp"Dim strtemplate As String = strPath & "\" & "inputDoc.docx"Dim strNewFile As String = strPath & "\outputDoc.docx"If System.IO.File.Exists(strtemplate) = True ThenIf System.IO.File.Exists(strNewFile) = True ThenSystem.IO.File.Delete(strNewFile)End IfSystem.IO.File.Copy(strtemplate, strNewFile)Dim xmlDoc As New XmlDocument()Dim customXML As String = "<root><CustomerName></CustomerName></root>"xmlDoc.LoadXml(customXML)Dim xmlnode As XmlNodeList = xmlDoc.GetElementsByTagName("CustomerName")xmlnode(0).InnerText = "What ever you want to insert"customXML = xmlDoc.InnerXml.ToStringReplaceCustomXML(strNewFile, customXML)Dim doc As WordprocessingDocument = WordprocessingDocument.Open(strNewFile, True)Dim mainPart As MainDocumentPart = doc.MainDocumentPartmainPart.Document.Save()doc.Close()End IfEnd SubEnd Class
OK, there is still work to do. We are going to use a template document to house a content control which we will find and change the contents of, via a binding with some customXML . The mechanism here is that you will place a content control on the document, then creation a reference (or binding) to a custom XML entity. To change the content control content you will change the custom XML programmatically (via the asp page) and this will change the content control due to the binding.
OK, create a blank document called inputDoc.docx. Now in the ribbon go to the developer tab. (If the tab is not visible go here http://office.microsoft.com/en-au/word/HA101730521033.aspx). And insert a plain text control.
with the new control inserted…
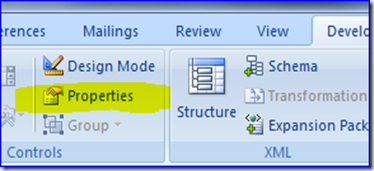
click on properties in the developer tab…
click on properties in the developer
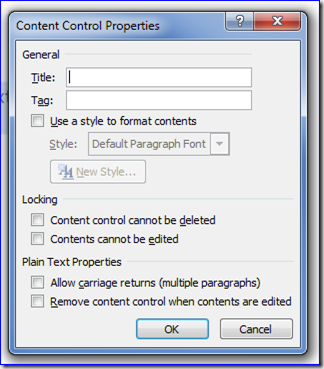
With the control properties dialog up, enter CustomerName into the Title and Tag fields. Click OK.
So we have now setup our control. Now we need to create the customXML and the relationship between the customXML and the control. Save the document into your c:\temp folder (or to the folder of your choice (remember you will need to modify the example code above)) and save it as “inputDoc.docx”.
Now this can be done manually by going into the docX package creating files in folders and blah blah blah…. However there is an easier way (and I like easy…)
The Word 2007 Content Control Toolkit, you can get it here http://www.codeplex.com/dbe
Once you have downloaded and installed, fire up the program, and open your document, you see something like this
Now we are going to create some custom XML part and bind it to the control. In the bind view on the right, click on the create a new custom XML part, and then click on edit view tab. You should see
<root>
</root>
Now change this to
<root>
<CustomerName>
</CustomerName>
</root>
Go to the bind View tab. Click on the CustomerName entry in the tree, Now select and drag it to the left pane (Content Controls) and over the control you want to create a relationship (in our case the tag CustomerName).
With that done, click save and close the program.
OK, thats it. Fire up your web page and click the button. You should hopefully find that a document called outputDoc.docx has been created alongside inputDoc.docx and has the contents of the control changed to new values.
Note: CustomXML is not supported in the office 2003 compatibility pack so if you are expecting to use this method with some office 2003 users then don’t as it will not work. I found this out to my own annoyance after getting it to work!…
References
http://www.devx.com/dotnet/Article/42221/1954
http://code.msdn.microsoft.com/OOXMLv20CTP/Release/ProjectReleases.aspx?ReleaseId=2080


No comments:
Post a Comment